
This article is following the How To Set Up an XPX V.2.0 RELAY node - XPX 2.0 Migration - 1/2: after you have your RELAY node up-and-running you can proceed to configure and run the forger node.
It is advisable to run the forger process in the same virtual machine of the relay node, however remote configurations are possible you need to undergo additional setup for it that is out of the scope of this document.
1. Configure XPX Forger
Connect to the xpx node:
ssh xpx@xx.xx.xx.xxLaunch the commander script and configure the forger:
cd core-commanderbash commander.shSelect Forger menu

Configure Forger

2. Start Forger

Insert node password in case you chosen (1) in the previous step

Forger is successfully started:

Check FORGER Logs

Forger started successfully

3. Monitor your node
To monitor your node you have two options:
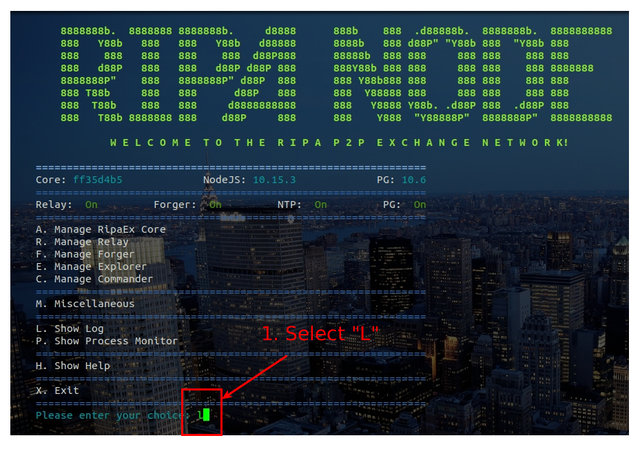
- check the logs from the main menu: this logs are cumulative of relay and forger processes installed in the node
- check processes from the main menu: this will show a detailed view of the processes run in your node with memory consumption, cpu usage of both relay and forger nodes.
Select "L" from the main menu:

Select "P" from the main menu:


CONGRATULATIONS: you have successfully installed your XPX Forger Node V.2.0
Remember to connect to us...
Website: www.ripaex.com Telegram: t.me/ripaex Slack: slack/ripaex Bitcointalk ANN: bitcointalk.org/index.php?topic=3759172 Whitepaper: github.com/RipaEx/whitepaper/raw/master/eng/RipaEx_WP_EN.pdf Facebook: www.facebook.com/ripaex Twitter: twitter.com/ripaex Gitter: gitter.im/RipaEx/RipaEx GitHub: github.com/RipaEx/ Blog: steemit.com/ripaex


